Slight Miscalculation

To many ads? Support ODJT and see no ads!
Hopefully you've found them .. I know they have them a HD and Lowes .. maybe even the local Ace Hardware.

BTW, where'd you get that single outlet/USB plate?

Just got back from Ace Hardware. Got me a drill bit. I'll see if it works here in a few minutes.

The USB Outlet came from Amazon.com...

Black USB AC Wall Outlet Magnadyne WC-101B USB Charging AC Wall Outlet AC outlet: 15A, 125V USB input current: 300 mA maximum DC 5V, 1000 mA - - Amazon.com

... pretty nice, huh? Even gives me an outlet up top I can plug my tablet or phone into.[emoji4]


Sent from my iPhone using Tapatalk
 
  • Like
Reactions: steve149
Just got back from Ace Hardware. Got me a drill bit. I'll see if it works here in a few minutes.

The USB Outlet came from Amazon.com...

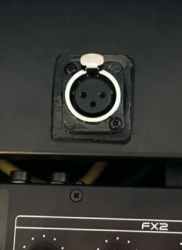
OK... That DID NOT go well![emoji1] It was BRUTAL!!! The new drill bit chewed a huge hole in the panel... NOT GOOD!... So what now? The hole is too big. I could just order another panel and try again, but that would take some time unless I pay for next day delivery. I think what I'll do is make a rubber bushing out of a big rubber washer, and see if I can make it look like it was meant to be that way.[emoji1] If it works; GREAT![emoji4] If it doesn't, I order a new panel and start over.[emoji37]


Sent from my iPhone using Tapatalk
 
  • Like
Reactions: ittigger
... I think what I'll do is make a rubber bushing out of a big rubber washer, and see if I can make it look like it was meant to be that way.[emoji1] If it works; GREAT![emoji4] If it doesn't, I order a new panel and start over...

How about that???:laugh: IT WORKED!!!:djsmug: I'll post a pic in the morning, but I used a large rubber washer to make a rubber bushing to place under the recessed XLR panel mount jack, which covered the chewed up oversized hole, and I used a piece of the steel (from the rectangular hole I cut out earlier today) to sandwich on the back and to provide screw holes for the XLR jack. It feels pretty sturdy, and it looks OK. I may go ahead and order a new hinged panel and make a replacement, but there's no rush to do it now.:nod: How much did the fix cost me???... The large rubber washer cost $1.98. Cost me an extra hour. Would have been nice if I could have drilled the perfect hole and mounted the XLR jack in the 15 minutes I was expecting it to take, but sometimes stuff happens differently than you expect.:laugh:


Sent from my iPhone using Tapatalk
 
Last edited:
I promised pics this morning, but didn't quite make it.:laugh: Been pretty busy today, but here's a couple of iPhone pics...
upload_2017-7-27_12-16-34.png

... ^^^^ not a great pic, but this is the microphone mount I had to modify. :djsmug:

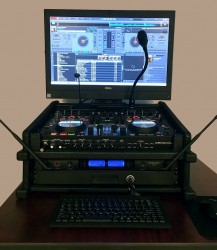
upload_2017-7-27_12-25-10.png

^^^^ Here's a pic of the finished small system. Sorry about the picture quality. I don't own a good camera, so iPhone pics are the best I can do. I'll try to take and post some better ones later.:-/... I'll also take some pics of the back.
 
I've changed my mind again.[emoji1]I decided to remove the Equalizer and put the 1U drawer in. Originally, my small system had a 1U keyboard drawer. I opted to go with a smaller keyboard and mouse combo to save the space and weight. However, I've been playing with the system all day, and there really isn't much value in having the Equalizer in it, and it just adds another failure point. I think I'm just gonna keep it super simple. I also found that the microphone EQ's on the controller work good enough to deal with any feedback issues. I tested it out by inducing feedback and mitigating it with the EQ's of the controller alone. I like the look of something besides a drawer in that slot, but clients rarely see that side of the rack anyway, and why should I care if it looks cool or not? So the small system is done. Now I need to finish up my large system. I think since I'm on this simplification kick, I'm gonna reconsider what I'm putting in that rack as well.[emoji4]


Sent from my iPhone using Tapatalk
 
  • Like
Reactions: ittigger
Very nice...the only items my OCD brain sees that I would have done differently is putting the mic and light at opposite ENDS of that plate.

They seem to almost be in the way IMHO...
 
  • Like
Reactions: ittigger
Very nice...the only items my OCD brain sees that I would have done differently is putting the mic and light at opposite ENDS of that plate.

They seem to almost be in the way IMHO...

I thought the same thing at first, but you actually look over them. I took that pic from the height of the table so the lower portion of the rack was visible. I'll take another pic from actual viewing height so you can see what I see when using the system.

Also, I couldn't put them closer to the edges. There are cables coming out of the controller, so I had to mount them where the back of the hinged panel would clear those cables. On the left side, I mounted the USB plate as close to the hinged panel's latch as I possibly could without rendering it unusable. It's a bit of a compromise.[emoji4]


Sent from my iPhone using Tapatalk
 
Understood...thanks for the clarification.
Here's a pic taken with the camera held right up against my eyes while I'm standing where I would normally stand...
upload_2017-7-28_9-56-28.png

... Notice... I can't even see the wireless microphone system. I have to actually kneel down a little to see it. Fortunately, once it's set up, there's not much to do on that front panel. The EQ's are all on the front of the controller. Here's what it looks like when I kneel down (table height)...
upload_2017-7-28_10-0-10.png

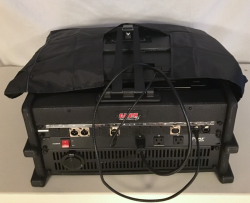
Here's what it looks like from the back when it's packed up and ready to load in the case...
upload_2017-7-28_10-1-40.png

... and here's a pic of my microphone mount...
upload_2017-7-28_10-2-30.png

I should have spray painted it, rather than using a brush, but I was in too big of a hurry to get it done; I didn't want to take the time to take the hinged panel back off and mask it all off before spraying it. Got a little lazy, but it's not something that's obvious to the naked eye.:laugh:
 
Now you have me rethinking things ....
 
  • Like
Reactions: DJ Bobcat
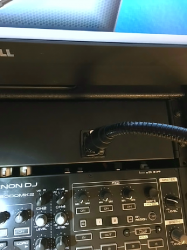
I took this pic with the hinged panel open so you can see inside the case...
upload_2017-7-28_10-23-16.png
I can get in there and see all the connections, although I do need a little flashlight when digging around in there.:djsmug:

One other thing I need to be careful of is, when adjusting the monitor (AIO computer), I have accidentally shut it down because the power button is on the edge, right where I would normally grasp the monitor to move it forward or backward. I'm sure I'll get use to it.

One other little piece of info I thought you might like to know... it weighs 67 pounds. That's almost 20 pounds more than I would like, but it will be OK, I think. It's lighter than the previous version, but I don't really understand how it got SO heavy. The 1U drawer did not help, but I really can't see anything I'd remove.
 
I took this pic with the hinged panel open so you can see inside the case...
View attachment 32596
I can get in there and see all the connections, although I do need a little flashlight when digging around in there.:djsmug:

One other thing I need to be careful of is, when adjusting the monitor (AIO computer), I have accidentally shut it down because the power button is on the edge, right where I would normally grasp the monitor to move it forward or backward. I'm sure I'll get use to it.

One other little piece of info I thought you might like to know... it weighs 67 pounds. That's almost 20 pounds more than I would like, but it will be OK, I think. It's lighter than the previous version, but I don't really understand how it got SO heavy. The 1U drawer did not help, but I really can't see anything I'd remove.
Put one of those battery powered LED pucks (if you can find a small one) under the hinged panel between the 2 jacks ... maybe like: Ecolight BO1083-WHG-06LF3-E Battery-Operated 6 inch Led Selectable Timer Tap bar Light Battery-Operated 6 inch Led Selectable Timer Tap bar Lightwhite - - Amazon.com
 
  • Like
Reactions: ittigger
Good idea![emoji4]... Hope it doesn't weigh too much.[emoji1]


Sent from my iPhone using Tapatalk
I'm sure there are some at the Dollar store that don't weigh much more than a battery or 2.
 
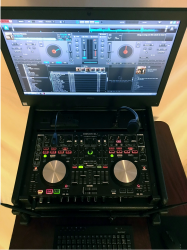
One more pic. This one is more like what I actually see when using this system. The controller really isn't in view unless I glance down, but you can clearly see the entire screen; no blockage by the light or microphone...
upload_2017-7-28_13-16-9.png
 
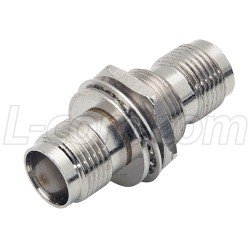
CRAP!!!... Cables came today and they don't work. I ordered some 1.5ft. TNC cables so I could mount the four antennas of my wireless microphone system on the patch panel on the back of my rack. The length is good; the end that connects to the GTD Audio B-33 works fine, but the end where the antenna should connect doesn't work. The antenna would screw onto it if there wasn't a wire coming up in the center, where there should be a hole for the wire of the antenna connector to fit in. If I knew the correct terminology to identify that connector, perhaps I could find one. I may have to find a cable place here in town that I can take the antennas to and show them exactly what I need. This is gonna keep me from finishing this large rack up, though, and I'm really worried about it not being done in time to use for my next gig. I guess I can just not use the wireless mics. My OCD says everything MUST work perfectly before I use it.[emoji1]


Sent from my iPhone using Tapatalk
 
  • Like
Reactions: ittigger